Age Of The Home
If you’re home was built within the last 20 years or so, chances are you probably have some form of insulation for your foundation walls. This could be in the form of an exterior insulation application using rigid foam on the outside of your foundation walls or an insulation application on the interior side of the wall.
Depending on the specifications for when the home was built, the builder may have used an exterior insulation method using rigid foam boards. These would be installed after the foundation was poured and before the foundation was backfilled. Installing exterior rigid foam is a lot tougher to do after the fact because most likely, there’s landscaping in the way and the installer would have to excavate around the exterior perimeter of the home. If your home does not have exterior rigid foam insulation, do not worry. There are other ways to provide the proper insulation for your basement. We’ll get into that more later.
In other cases, the builder may have used blanket-style insulation on the interior walls of the foundation. A common type of blanket insulation would be a vinyl-faced fiberglass blanket that gets tacked onto the concrete wall. Click HERE for some additional information on this style of insulation for the interior of the basement walls. This type of insulation is relatively inexpensive and is used when there are no framed walls planned for the home. The good news is that if you already have this style of insulation in your basement, it’s still possible to frame new walls without removing the insulation. The only downside is that those newly framed walls will butt up to the insulation and you would lose a few inches of finished space.
There is another style of blanket insulation that we’ve used on a couple of our new home builds and that’s the EcoCell Cellulose Blanket. This blanket style is a lot different than the vinyl-faced fiberglass blanket in that they are compact “panel” style blankets that get glued onto the wall as opposed to pinned to the wall. What I really like about this style of insulation is that since it’s compact, you don’t lose much space when framing walls up to them. To achieve an R-10 insulation value, we would go with the 2-1/2” thick blankets. That’s fairly minimal in terms of lost space in the basement. They are certainly easier to install however the material is a little more expensive than fiberglass. Either way, this is my preferred method for insulating a new home’s foundation walls if there’s no immediate plan to frame basement walls.
If you own an older home and notice that there is no insulation on your foundation walls, no need to panic. Insulating a few walls in a basement becomes part of the scope of work. You want to make sure that your basement has the proper insulation in order to meet the energy code requirements and ultimately make it a comfortable space for when you are down there hanging out. Let’s take a look at a couple of different methods we use when finishing a basement that doesn’t have any existing insulation.
Different Insulation Options
As mentioned in one of my previous blogs How Much is a Basement Contractor, I outline a few considerations before finishing a basement – one of them being the existing conditions of the foundation walls and if there is any sort of waterproofing that’s been done. If the home does not have any sort of waterproofing such as drain tile and a sump pump, that should be addressed first. For the sake of this article, let’s assume that waterproofing has been done and that the basement is free of the potential for water infiltration.
As mentioned above, there are a couple of different ways of insulating the foundation walls during the construction of the home but those methods typically assume that walls will not be framed in the basement. So what do we do if there’s no insulation on the foundation walls but want to frame new walls and insulate? We have a couple of options.
The first option, and probably the most economical, would be to insulate the newly framed 2×4 walls with R-13 Kraft-faced fiberglass insulation batts. This type of insulation is readily available from most suppliers and is easy to install. They come in rolls or batts and are installed between the studs and stapled in place. Most people that we work with go with this option because it’s inexpensive and easy to install.
A second option would be to use a mineral wool material such as RockWool. This mineral wool insulation is nice because it has a higher R-Value than fiberglass since it has more density to it, it’s flameproof (so it helps with fireproofing), and has better sound attenuation than fiberglass does (we’ll talk a little bit more about sound attenuation later). We’ve used mineral wool quite a bit and is a great insulation product.
Another option would be to go with a blown cellulose product. Cellulose is the most eco-friendly material made up of mostly recycled newsprint and denim. It boasts a higher R-Value than that compared to fiberglass or even RockWool. You can blow it in loose, dense-packed, or wet-blown. It has great sound attenuation, is flame-retardant, and is mold/mildew resistant. It does however come at a bit of a higher cost due to the necessary equipment needed to apply the material. Fiberglass and mineral wool come in batts and can easily be installed between studs. Cellulose must be blown-in, thus requiring more tools and equipment. So depending on the budget, cellulose may be a great option.
Other Insulation Considerations
In addition to insulating the cavities of your newly framed walls, there are a couple of other things to consider regarding basement insulation. As you look at the bottom side of the floor framing above and follow it to the ends of the foundation walls, there are cavities in those spaces as well (rim-joist and box sills). If these cavities are not properly insulated, you can get quite a bit of hot or cold air blowing in there making the basement fairly uncomfortable.
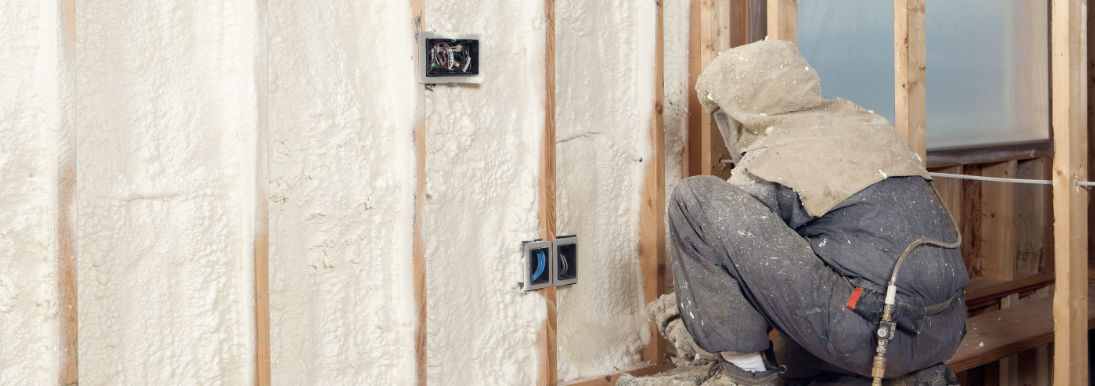
One of the best methods to ensure these cavities are properly insulated is to use spray foam insulation. Spray foam insulation will add the thermal protection that you need as well as seal any air leaks – all in one step. Similar to blown cellulose, spray foam requires special equipment for application and comes at a cost. However, for the additional cost, I believe it’s worth it. You could go with fiberglass or mineral wool batts – those will provide the thermal protection but you’ll lose out on the air-sealing characteristics that spray foam offers. In any case, it’s important to ensure that these areas are well-insulated before moving forward and finishing your basement. If not, you will certainly have a “drafty” basement and won’t be as comfortable.
Another question I get a lot is how to “sound-proof” areas in the basement. We’ve done projects where we soundproof an office area, isolating it from the rest of the basement or just a couple of walls between bedrooms. We’ve even soundproofed an entire basement, filling in all the cavities in the walls and ceilings above with insulation. If you are looking to keep your basement a bit quieter from either the 1st floor above or between rooms, adding sound-proofing insulation is the way to go.
Similar to what’s been mentioned in this article, there are a couple of methods you can use to apply soundproofing insulation. In my experience, fiberglass is not a great option – it simply does not provide the kind of soundproofing you might be looking for since it’s not designed to do so. The two most popular methods we’ve used are using either mineral wool, made specifically for soundproofing, or going with blown cellulose.
If you are looking for the best method that will make your basement the quietest, blown cellulose is the way to go. We did a job last year where we had our insulators blow cellulose into the entire ceiling of the basement. The clients wanted to make sure the basement was not disturbed by the rumblings of people moving around on the first floor. It was an easy task. The insulators first applied a netting material to the floor joists above (to keep the insulation from falling down), then simply blew in the cellulose afterward. They had roughly 2,000 square feet of soundproofing insulation installed in 1 day. Totally worth it for the client to go this route. And it was amazing how immediately quiet it was in the basement when they were done.
The one major consideration you’ll have to make when wanting soundproofing insulation in a basement ceiling is that you’ll have to go with a finished dry-walled ceiling as opposed to keeping it open. For obvious reasons, you probably don’t want to look up at the ceiling in your basement and see all the insulation up there – especially if it’s netted and blown-in cellulose. Therefore, if you decide to soundproof your ceiling in the basement, especially if you go with blown cellulose, you’ll have to drywall the ceiling. If you decide to go with a drop ceiling, that could potentially work as well. But for the ultimate finished look, drywall is your best option.
What To Do Now
As you can see, there are many things to consider regarding insulation requirements and needs when looking at a basement finishing a project or any construction project for that matter. Unless you work in the construction industry, the process of figuring out what your best options are may be confusing and scary. However, here at Red Cloud Contracting, we have a process that helps solve this problem of not knowing what to do or how to move forward. It’s called the 3D Experience, and it’s something to get excited about.
The 3D Experience stands for Dream, Design, Deliver. Each step intentionally walks you through the process – considering your dream for the space, your budget, all the considerations mentioned above, and more. The main goal is to make it easy for you and lays out a path to move forward.
Being that we offer a firm price for our projects, we realize that this pricing model requires a lot of planning and design work, and we do charge a pre-construction fee. Based on your overall needs for planning and designing the project, there are 3 different options ranging from $500 – $8,000. Take a look at our Bookings page for more information. The first call is always free. We’d love to help walk you through your next basement project!
So, what do you do about insulation in a basement? The answer is: It depends! Here at Red Cloud, we are committed to walking you through the process so that you can be sure you’re hiring the right contractor, ensuring the top talent is working on your project, and ultimately making your dream become a reality.